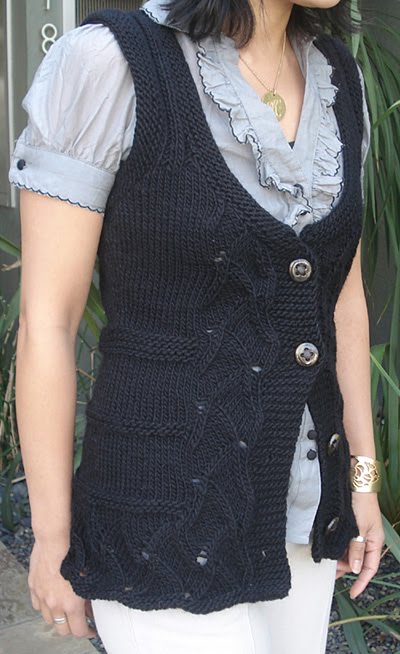
Vest with left-over Bernat Baby coordinates
I used another skein of Bernat Baby coordinates I purchased over a year ago to make a vest. I had bought the yarn to make this sweater dress and had ample left-overs. I had enough to make a long sleeve sweater, but lately I have become interested in layering vests over button shirts. I have a number of cute blouses and I am hoping that this vest will extend their seasonal longevity. We have long winters up in North-East Pennsylvania.
At the same time, also work neck side decreases, at the edge of the lace border, on RS. A decrease row is worked the following way: K until 2 stitches shy of the lace border (includes 2 edge stitches so 12 stitches total as we have been counting for the lace border), K2tog, work in pattern to end of row. Work a decrease row every 4th and 2nd row 5 times, then every 4th row 4 times. You should have 15 stitches + 5 ribbing edge stiches left on the needles by the time you are done with the decrease rows.
Work even until the sleeve hole height matches the one on the back panel. BO for shoulders the same way as for the back. Also M1 purl stitch between the lace border and the neck band (so there are 3 purl stitches instead of 2 between the two).
Once the shoulder stitches have been bound off, you should have 6 stitches left on the needles. Continue to work on the 6 stitches in rib pattern until the band is long enough to go around half the back of the neck line. Leave the remaining stitches on the needle and cut off the yarn, leaving a 30 cm tail. If you find it difficult to finish the right front with these 6 stitches still on the circular needle, you can place them on a safety pin instead.
Go back and finish the right front. Attach thread at neck side. Slip 1, M1, K1, M1, K1, finish row in pattern. Continue, mirroring the left front. The last decrease on the sleeve side, worked on a RS, goes: K to last 4, K2tog, K last 2. The decreases on the neck side are worked on the edge of the lace pattern as for the left front. They are worked on RS rows, as SSKs.
Finishing:
Sew the shoulders together, joining the 15 BO stitches of front and back. That leaves the two bands for the neck edge, sticking out from the right and left front panels. Check that the two bands join nicely in the middle of the neckline in the back. Adapt if necessary by knitting a couple more rows or undoing a couple rows. Now comes the fun part. Grafting the two together. That took some research, but here is what I came up with. I recommend reproducing or printing the following instructions and crossing them out one by one as you get each step done.
This is a version of kitchener stitch, adapted for grafting together 1/1 ribbing. Place the stitches you had a on hold on two needles and hold one needle in front of the other. Place the thread tail attached to the front needle on a darning needle. You should have purl stitches presenting themselves first.
Below, the symbols mean the following:
FN: front needle
BN: back needle
KL: insert the darning needle as if to knit, leave stitch on needle
KD: insert the darning needle as if to knit, drop stitch off knitting needle
PL: insert the darning needle as if to purl, leave stitch on needle
PD: insert the darning needle as if to purl, drop stitch off knitting needle
Detailed steps:
Finish each arm hole: pick up stitches along the edges of the armhole and work 4 rounds in garter stitch (one round knit, one round purl, repeat). BO all stitches loosely. I do a basic BO, but go up several needle sizes when binding off.
Sew buttons on the front center band, to your liking.
A few more pictures, showing off the lace and finishing.
I found this pattern (Talia vest on knitty.com) in my collection and was going to follow it to the letter. But I ended up with something different. Aside from a different yarn, I had several design concerns that came up as I was working on adapting for gauge and size.
 |
| My version |
 |
| The original version from knitty.com |
- I wanted the petite version, one that fell right below the waist. So I started by removing two of the bands below the waist in the original design.
- Once I did that, I decided that the garter accent at the waist would not work with the lace border attached directly to it, though I did edge my lace bottom border with a couple rounds of garter stitch.
- Again, for the petite version, I decreased the depth of the neckline.
- Then I decided that buttons were too fussy. So I made it a sweater vest (my buttons are fake).
- While working on the sweater version of the vest, I found that a V-neck would look better (and would be easier to work with).
- With a more conservative, V neckline, I found that I could and should continue the lace border up to the shoulders.
- With variegated yarn, I decided that the ribbing from the shoulder-blades up would look too busy so I worked the back in plain knit stitch.
 |
| The back of Talia vest by knitty.com's designer Katherine Lee Nice detailing that works best with solid color yarn |
 |
| The back of my version of the vest, modeled with my ruffle knit skirt |
Below is the pattern, in size 0 - 00P. (length = 48 cm, sleeve hole height = 14 cm, waist = 64 cm, bust = 76 cm). The yarn used is between fingering and sportweight. On 4 mm needles, a 10cm x 10cm square takes 16 st x 24 rows in stockinette stitch. The sweater is knit in the round up to the sleeve holes and V neckline, which are started at the same time in front. The work continues back and forth, separated for right and left shoulder in front, and in one piece for the back.
The lace pattern is worked on multiples of 10 stitches. See the original pattern for the lace border chart. When working in the round, replace all SKP by SSK.
You can use any lace border you fancy, but you will have to adjust the number of repeats and may have to fudge with the overall number of stitches cast on at the bottom of the vest, as they must be an integer multiple of your lace pattern, plus edge stitches, plus front band. Also be aware that if your lace pattern repeats over more than 10 stitches, it will make the V-neck shaping trickier, as you will run out of stitches for the lace pattern before binding off for the shoulders. This may not be an issue if you are adapting the pattern for a larger size or with a finer gauge, so you have more stitches left on the needles by the time you get to the shoulder bind off.
You can use any lace border you fancy, but you will have to adjust the number of repeats and may have to fudge with the overall number of stitches cast on at the bottom of the vest, as they must be an integer multiple of your lace pattern, plus edge stitches, plus front band. Also be aware that if your lace pattern repeats over more than 10 stitches, it will make the V-neck shaping trickier, as you will run out of stitches for the lace pattern before binding off for the shoulders. This may not be an issue if you are adapting the pattern for a larger size or with a finer gauge, so you have more stitches left on the needles by the time you get to the shoulder bind off.
The sweater is worked using a 4 mm circular needle that is long enough to comfortably fit 120 stitches. For finishing the armholes, you either need a shorter circular needle, double pointed needles, or a second circular needle (and use the two circular needles technique for small rounds).
Instructions:
CO 122 stitches on the circular needle.
Work 4 rounds in garter stitch. In the round, that means alternate knit and purl rounds. The last round of garter stitch is a purl round.
Next we work the lace border. In the center front of the sweater, there is a P2, K6, P2 band. For now, place your beginning of round marker at the edge of the central band. Do: P2, K6, P2, K1 (an edge stitch for the lace pattern), 11 repeats of the lace pattern back to back, K1 (edge stitch for last lace repeat).
Work 18 rounds as set above. That is one vertical repeat of the lace pattern.
Next work a decrease round. P2, K6, P2, 12 stitches of lace pattern (central 10 of pattern plus 2 edge stitches), K2, [K2tog,K2] 18 times, K2, 12 stitches of lace pattern (106 sts).
Next we work two ridges in garter stitch, keeping the front P2,K6,P2 band, as well as one repeat of the lace pattern flanking it. From beginning of round: P2, K6, P2, lace pattern over 12 stitches, purl to last 12 stitches, lace pattern. Next round: same, except k to last 12 stitches. Repeat these two rows one more time. Continue to work the knit round with the lace border and central band.
Move your beginning of round marker to the left side seam (that is 22 stitches earlier than where it stands now) and add a marker at the other side seam. From now on, from your beginning of round marker, you should be doing: K10, 12 stitches of lace pattern, P2, K6, P2, 12 stitches of lace, K10, seam marker, K 52, end of round. Work 9 rounds as established.
Next start increasing at the side seams. Work one increase round every 8 rounds, 3 times. The increase round is as follows: K, SSK, work in pattern until 3 stitches shy of second seam marker, K2tog, K, pass marker, K, SSK, K until 3 stitches shy of end of round marker, K2tog, K. For useful notes on how to work neat left leaning and right leaning decreases, see my post on techniques (technique 6). You should have 118 stitches on the needles.
The next set of increases is going to take place a the edge of the lace border, as darts for the chest. Work the following increase round 3 times, every 5 rounds: K until 3 stitches shy of the lace border, SSK, K1, 12 stitches of lace border, P2, K6, P2, 12 stitches of lace border, K to 3 stitches shy of seam marker, K2tog, K1, pass marker, K1, SSK, K to last 3 stitches of round, K2tog, K. 128 stitches after all 3 increase rounds are done.
When work measures 31 cm from the beginning, split for the neckline and begin armholes, simultaneously. We are going to work on the back panel first then come back and do the front two panels. In working back and forth, use technique 2 for a nicer finish.
Work in pattern until 2 stitches shy of the second side seam marker (work across the front of the sweater). BO the next 4 stitches. From now on, work the back side back and forth.
K across back to the beginning of round marker, then knit 2 stitches of the next round. Turn.
BO 4 stitches at the beginning of the next row, P to end (60 sts). Continue to work back and forth, decreasing on each side for the armholes as follows. BO 2 stitches at the beginning of the next two rows (56 sts). On the next RS row, work one last decrease row for armholes: K2, SSK, K to last 4, K2tog, K2. (54 sts).
Work even until work measures 17 cm from the beginning of the sleeve hole then shape the back of the neckline: BO center 10 stitches and continue on each side separately. On each side of the neck, BO 3 sts, then 2 sts. On next RS row, BO 1 stitch on each side of the neck. For a neat result, leave 2 edge stitches and work the proper leaning decrease (SSK or K2tog). See technique 6.
Start binding off for shoulders, while continuing the neck decreases. At beginning of next RS row, BO 5 sts for shoulders. Also decrease 1 st on each side for neckline. At beginning of next row (WS), BO 5 sts for shoulders. At beginning of next row (RS), BO last 5 stitches.
Now we come back to finish the front. The front has the lace pattern, now worked back and forth. This introduces two degrees of difficulty: 1) the even rows must now be purled. 2) The decreases must be worked on purl rows as well as knit rows. See, again, technique 6 to learn how to obtain a neat result. At each purl decrease you work, pull on the work and turn it around to check the look. It is easy to get confused and work the wrong kind of decrease.
To make the V neck, we are going to split the central 6 stitches down the middle. If we live them as K3 on each side, the edges will curl. So we need to turn the 3 stockinette stitch edge into a rib edge.
Left front (RS): Attach thread at seam side and work in pattern until you get to the central K6 stitches. On the last 3 stitches, work the following: K1, M1, K1, M1, K last stich. Turn. From now on work back and forth. Each WS row is: Slip 1, K1, P1, K1, P1, K2, 12 lace border stitches, P to end.
Work in pattern, decreasing on sleeve side 2 stitches, twice. Work one more decrease row on sleeve side, on next RS row: K to last 4, SSK, knit last 2 stitches.
At the same time, also work neck side decreases, at the edge of the lace border, on RS. A decrease row is worked the following way: K until 2 stitches shy of the lace border (includes 2 edge stitches so 12 stitches total as we have been counting for the lace border), K2tog, work in pattern to end of row. Work a decrease row every 4th and 2nd row 5 times, then every 4th row 4 times. You should have 15 stitches + 5 ribbing edge stiches left on the needles by the time you are done with the decrease rows.
Work even until the sleeve hole height matches the one on the back panel. BO for shoulders the same way as for the back. Also M1 purl stitch between the lace border and the neck band (so there are 3 purl stitches instead of 2 between the two).
Once the shoulder stitches have been bound off, you should have 6 stitches left on the needles. Continue to work on the 6 stitches in rib pattern until the band is long enough to go around half the back of the neck line. Leave the remaining stitches on the needle and cut off the yarn, leaving a 30 cm tail. If you find it difficult to finish the right front with these 6 stitches still on the circular needle, you can place them on a safety pin instead.
Go back and finish the right front. Attach thread at neck side. Slip 1, M1, K1, M1, K1, finish row in pattern. Continue, mirroring the left front. The last decrease on the sleeve side, worked on a RS, goes: K to last 4, K2tog, K last 2. The decreases on the neck side are worked on the edge of the lace pattern as for the left front. They are worked on RS rows, as SSKs.
Finishing:
Sew the shoulders together, joining the 15 BO stitches of front and back. That leaves the two bands for the neck edge, sticking out from the right and left front panels. Check that the two bands join nicely in the middle of the neckline in the back. Adapt if necessary by knitting a couple more rows or undoing a couple rows. Now comes the fun part. Grafting the two together. That took some research, but here is what I came up with. I recommend reproducing or printing the following instructions and crossing them out one by one as you get each step done.
This is a version of kitchener stitch, adapted for grafting together 1/1 ribbing. Place the stitches you had a on hold on two needles and hold one needle in front of the other. Place the thread tail attached to the front needle on a darning needle. You should have purl stitches presenting themselves first.
Below, the symbols mean the following:
FN: front needle
BN: back needle
KL: insert the darning needle as if to knit, leave stitch on needle
KD: insert the darning needle as if to knit, drop stitch off knitting needle
PL: insert the darning needle as if to purl, leave stitch on needle
PD: insert the darning needle as if to purl, drop stitch off knitting needle
Detailed steps:
- FN, KL (insert the darning needle as if to knit into the stitch on the front knitting needle, pull the thread through, leave the stitch on the knitting needle)
- BN, PL
- FN, KD
- FN, PL
- BN PD
- BN, KL
- FN, KD
- FN, PL
- BN, KD
- BN, PL
- FN, KD
- FN, PL
- BN, PD
- BN, KL
- FN, KD
- FN, PL
- BN, KD
- BN, PL
- FN, KD
- FN, PL
- BN, PD
- BN, KL
- FN, KD
- BN, KD
Finish each arm hole: pick up stitches along the edges of the armhole and work 4 rounds in garter stitch (one round knit, one round purl, repeat). BO all stitches loosely. I do a basic BO, but go up several needle sizes when binding off.
Sew buttons on the front center band, to your liking.
A few more pictures, showing off the lace and finishing.
 |
| Lace border and decrease at edge of V-neck |
 |
| Back of the neck |
 |
| Lace detail at the bottom with garter stitch edge |


Comments
Post a Comment