Replacing a skirt lining Part 1
Today I tackled the project of replacing the lining on one of my favorite winters skirt. It's that time of year when winter skirts are becoming a thing again. The skirt was featured in my blog on skirts over the past 100 years. It's the 1930's style. I used 1 yard of black satin for the project.
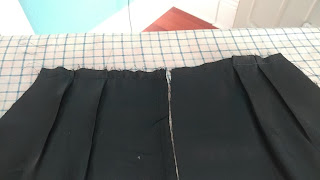
This, shamefully, is how far the damage has gone on the lining.
The seam in the center back came apart, as did one of the side seams. The fabric is too damaged to hold new seams so I am doing a complete replacement of the lining. This project is going to be a good learning experience on how to line a garment.
I started with an analysis of how the lining was constructed and attached to the skirt, and took pictures so I would have that as reference.
The lining is attached to the skirt at the waist and in the back, on either side of the buttoned slit. Nowhere else. There are darts in the lining, but they are only sewn shut at the waist, the rest is just folds. And then there is a lot of detail in the finishing, including a stabilizing tape and top stitching at the waist.
I started by using my pencil skirt slopers to cut the new lining and assemble the beginnings of a pencil skirt. I needed two mirror panels for the back and one whole piece for the front. I cut the back pieces on folded piece of fabric with the two sides pinned together and the front panel on the fold. I used a 1 cm seam allowance. To be safe, leave an extra few inches at the bottom of the lining panels past the length of the skirt. It's easy to trim when hemming the bottom, not so easy to deal with if the lining is too short.
I then prepared the darts and stabilized the waist line on the panels. This involved tracing darts and pressing them as one normally does. But then, instead of sewing the darts, I worked a row of basting stitches across the top of the skirt panels.
Next I sewed the two side seams, attaching each of the back panels to the front panel, holding the pieces right side together as one normally does. I was careful to do a neat finish on my seams. Overhang stitching, then top stitching of the seam allowance flat.
With the skirt shell turned inside out, and the lining skirt right side out, I inserted the lining into the skirt. The bottom line was to end up with the lining inside the skirt, the wrong side of the skirt facing out, and the right side of the lining facing the right side of the skirt. It is important to get this step right and check it twice. Essentially, this is what we want:
I stitched the top of the lining to the top of the skirt with a 1 cm seam allowance. To be safe, I did an overhang stitch. The skirt fabric doesn't fray at all, but he satin lining, does, like crazy. It is easiest to work with the zipper open.
After that, it's essentially all finishing.
First, we need to work around the zipper. I trimmed the lining flush with the zipper. If I do that again, I will give it 5 mm more. But it was just enough.
I then continued the cut at an angle to join the side of the back panel. I mirrored the process on the other back panel. The goal is to clear the zipper opening.


Comments
Post a Comment