For previous steps on the teal blazer, see the label teal blazer.
This next step is technically not in the book I am following, but they do say that the general rule is to attach the lining to the bottom hem of a jacket, and leave it loose if it's a coat. We have a blazer. I developed a method to arrive at a result where there is play between the lining and the bottom hem. This involves pressing the lining under and then working a line of stitching in the appropriate place. The first step is to temporarily secure the lining to the garment to know where to fold the bottom of the lining.
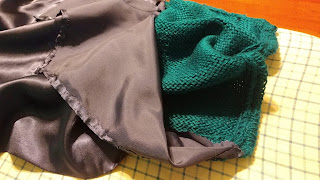
First, pin the lining at the shoulders and along the sides to where it is going to exist in the end. Leave the bottom unattached. Turn the bottom edge of the lining under to where it is just a tad shorter than the actual garment. Press the fold, unpinning the lining from the blazer as needed. Check that the fold is where you want it to be by holding the garment and watching how it hangs with the lining.
 |
| Bottom edge of the lining, turned under and pressed |
If you find at that stage that you have a lot of extra fabric under the fold, now you can trim that out. Leave 1 to 2 cm beyond the fold, that band will be the recipient of a line of stitching.
The next part is a little tricky. We want to secure the lining to the bottom of the blazer by stitching the flap under the fold to the wrong side of the blazer that it touches. Unpin the lining from the blazer. It will be attached at the side seams, but should be free everywhere else. Turn the work inside out so you can reveal the wrong side of the lining and attach it to the wrong side of the blazer.
 |
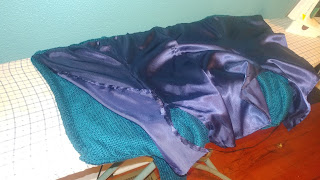
| Same situation as above, but with the lining opened to reveal the wrong side of the bottom edge |
Work a row of slip stitch between 5 mm and 1 cm from the fold. The stitching should go through single layer of lining (the flap under the lining) and the knitted part of the blazer. The fold will hang free below the row of stitching, allowing for ease. Also make sure you keep horizontal ease. I found that I had to undo the pleat down the middle of the back and sew it flat. I guess one could also interrupt the stitching to let the pleat hang freely (but then you would have to secure the fold).
 |
| A different view, this time with the bottom edge at the top of the picture. Shows the pinning and the stitching. Keep going all the way across. |
 |
| The finished "hem" |


Comments
Post a Comment