Spring break project: (faux) wrap pants - Day 9
Now we have two waist bands, the back and the front, prepared and pressed flat. Pin the waist bands with front sides facing.
Sew a seam away from the side that has the button hole. Press that seam flat, then fold the whole waist band in half and press flat. At this stage, I already had attached the front waist band to the pants (it made things more cumbersome) so I don't have a clean picture on this part of the process, but here is just half the waistband folded over as an illustration. You should have the entire waistband, with a seam down the middle.

Check for placement of that waist band again then pin it to the pants at the waist, right sides facing and lining up the seam of the waist band with the side seam of the pants. Attach it using the longest stitches your machine has and do not back stitch. This is a temporary seam. We want to do one more fitting before finalizing anything.

Try the pants on. Do needed adjustments. Once it all looks good, you can go ahead and trim the excess fabric, undo the temporary seam, overlock the fabric, and then work a permanent seam, using a tight stitch for strength. Line up the side seam with the seam of the waist band on the side that doesn't have the slit opening. Maintain that alignment when stitching (might involve starting two lines of stitching from the side seam down the back and from the side seam down the back). On the back, where the button hole is, stop stitching 1cm before you get to the edge, there is going to be some hand sewing finishing to do.
It's time for some finishing work.
Turn your attention to the raw end of the waistband that doesn't have the button hole Trim away excess fabric (that means leaving a seam allowance), overlock, then press the hem and stitch with color matching thread (stitching is visible). Work with the right side facing up and do your best to continue the line of stitching from the top part of the pants.


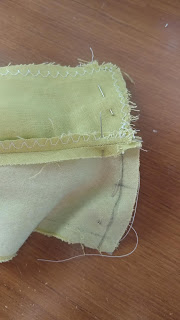
Next go to the end that has the button hole. Fold the raw edges inward as shown below and press.

Then press the two layers of the waist band laying flat. Finish the last cm of the seam and close the gap at the bottom of the flap (top as I have it oriented below) with hand stitching that is invisible from the front (sew into the seam allowance on the front of the waist band while the back of the waistband is facing you).

Attach the front panels to the front of the pants by top-stitching with matching thread. The waist tie will wrap on top of it, but we still want this to be as neat as possible. Use color matching thread. In choosing which panel to attach first, think of how real wraps would go. For me, that meant doing the left side (when looking at the pants lying flat front face up) first. The amount of overlap is up to you and the amount of fabric you have. I utilized all of what the patterned skirt had to offer and ended up having a 2 to 3 inch overlap in the front. Less overlap will show the pant legs, more overlap will make the garment look like a wrap skirt from the front. Experiment with the amount of overlap you find pleasing.


Sew a seam away from the side that has the button hole. Press that seam flat, then fold the whole waist band in half and press flat. At this stage, I already had attached the front waist band to the pants (it made things more cumbersome) so I don't have a clean picture on this part of the process, but here is just half the waistband folded over as an illustration. You should have the entire waistband, with a seam down the middle.

Check for placement of that waist band again then pin it to the pants at the waist, right sides facing and lining up the seam of the waist band with the side seam of the pants. Attach it using the longest stitches your machine has and do not back stitch. This is a temporary seam. We want to do one more fitting before finalizing anything.

Try the pants on. Do needed adjustments. Once it all looks good, you can go ahead and trim the excess fabric, undo the temporary seam, overlock the fabric, and then work a permanent seam, using a tight stitch for strength. Line up the side seam with the seam of the waist band on the side that doesn't have the slit opening. Maintain that alignment when stitching (might involve starting two lines of stitching from the side seam down the back and from the side seam down the back). On the back, where the button hole is, stop stitching 1cm before you get to the edge, there is going to be some hand sewing finishing to do.
It's time for some finishing work.
Turn your attention to the raw end of the waistband that doesn't have the button hole Trim away excess fabric (that means leaving a seam allowance), overlock, then press the hem and stitch with color matching thread (stitching is visible). Work with the right side facing up and do your best to continue the line of stitching from the top part of the pants.


Next go to the end that has the button hole. Fold the raw edges inward as shown below and press.

Then press the two layers of the waist band laying flat. Finish the last cm of the seam and close the gap at the bottom of the flap (top as I have it oriented below) with hand stitching that is invisible from the front (sew into the seam allowance on the front of the waist band while the back of the waistband is facing you).

Attach the front panels to the front of the pants by top-stitching with matching thread. The waist tie will wrap on top of it, but we still want this to be as neat as possible. Use color matching thread. In choosing which panel to attach first, think of how real wraps would go. For me, that meant doing the left side (when looking at the pants lying flat front face up) first. The amount of overlap is up to you and the amount of fabric you have. I utilized all of what the patterned skirt had to offer and ended up having a 2 to 3 inch overlap in the front. Less overlap will show the pant legs, more overlap will make the garment look like a wrap skirt from the front. Experiment with the amount of overlap you find pleasing.


Comments
Post a Comment