Technically, this project came off a clearance rack at Walmart. Cost of the garment before tax: $1. It was a XXXL (size 22) women's shirt in Indian cotton. I liked that there was a lot of fabric for the price tag. Over the next week, I looked at the top, watched sewing tutorial videos and thought about what to do with it. In the end, I went with the simple idea of a loose fitting summer dress.
 |
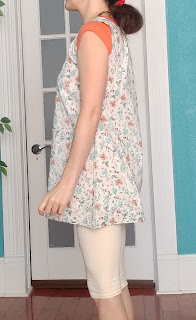
| Finished product |
 |
| Initial shirt |
 |
| Ruffles sleeves. I cut out the sleeves, separated the ruffles and saved them for use in the dress. |
The top had ruffled sleeves. I immediately saw a use for the ruffles for the bottom of the dress. I started by cutting off the sleeves at the shoulder seams and cut off the ruffles, giving me to long rectangles of fabric that I saved.
Being a complete beginner and still not very good at hems, I first tried to find a way to use the existing neckline. The issue with it is was that it was too wide and my bra straps were showing. I quickly found a solution on Youtube. Pleats. I made two in the front and two in the back, symmetric. This involves simply pinching the fabric and sewing for a few centimeters. Then secure the pleat flat at the neckline. Press just along the seam and no further.
 |
| Small pleats at the neckline in the back. I did the same on the front. |
After that I started the serious cutting. I found a simple loose fitting T-shirt dress in my wardrobe to use as a template and laid it flat on the shirt. I pinned one side and cut following the shape of the dress. I did not leave a seam allowance on the side, as the dress was plenty roomy. At the sleeves, I was not able to leave a seam allowance. That worried me a little, but the sleeve holes turned out OK in the end.
 |
| First serious cutting: along the edge of my template on one side, and just the fabric at the front of the shirt. |
Once I had half the front cut, I put away the template, folded the fabric along the center front and cut the other side symmetrically.
 |
| Fold the front panel in half, cut the other side symmetrically. |
Once I had the front all cut, I laid it over the back and tried to cut the back following the same shape. But here I ran into a lack of fabric at the shoulder seams and had to cut some more off the front panel. I really started worrying about the size of my armholes then, but I wanted to keep the shoulder seams and neckline intact.
 |
| Oh, no! Not enough fabric in the back panel to follow the armhole of the front |
 |
| Had to cut off some fabric. Sweat, sweat. |
 |
| After doing the alteration at the shoulder seams on both sides of the front panel, finally ready to cut the back panel. The two panels are still joined at the shoulders and remained so to the end. |
Once I was done cutting , I left the sides pinned together for a first fitting (very nervous at that stage about the armholes). But the dressed pulled on just fine.
 |
| Initial fitting. No seams done yet (aside from the shoulders). |
At that stage, I thought about shaping (darts at the chest, in the back), but I decided against it. The fabric did not lend itself very well to that kind of shaping (not at my skill level) and also, it is a very breathable fabric, ideal for hot weather. A loose fitting garment would further the comfort of the dress. So I went on as it was, with closing up the side seams.
Here a technical note. This is fabric that did not fray like crazy, but being woven, still had a tendency to fray. Before doing the seams, I prepared the edge by going over them with pinking shears. I further stabilized the edges by running long stitches along them. Then I used the classic technique of pressing the seams flat when done for a neat finish.
 |
| Edges prepared before use. Cut with pinking shears and stabilized with a row of stitches. |
|
The armholes were challenging. I did simple rolled hems, but the "simple" is only in the idea, not the execution. They are not pretty from up close, but only a fellow seamstress would notice that.
Finally, I had fun with the bottom of the dress. I prepped the two rectangles I got from the sleeve ruffles by pressing them flat and prepping the edges. I then sewed them together so I had one long band.
 |
| The two rectangles for the bottom ruffle of the dressed, pressed and prepped. |
The technique I tried here was gathering using dental floss and a wide zigzag stitch.
 |
Gathering fabric using dental floss. Lay a string of dental floss near the edge and slowly zigzag stitch over it using your widest zigzag, being careful not to catch the floss in the stitching. Go slow.
 |
| The finished effect. You have dental floss held in a tunnel. Now you can pull on the dental floss and distribute the fabric to the desired amount of ruffle. When done, cut and pull out the dental floss |
I sewed the other side of the band to form a loop and used the floss to generate the gathering required to match the bottom opening of the dress. I didn't have a lot of extra fabric, so the ruffles are subtle. But it worked. To reduce bulk, I placed the loop inside the bottom hem of the dressed, pinned in in place, and top stitched it.
|


Comments
Post a Comment